Friday, August 11, 2017

Introduction to Ethereum Name Service (ENS)

ENS is the Ethereum Name Service (like DNS), a distributed, open, and extensible naming system based on the Ethereum blockchain.

In general Hash based address' are used in block chain technology to specify the sending or receiving entity. Usually it is a 32 bit long random numbers that are generated in corelation with the Private Key of the user. The 32 bit address is hard to get crammed and in case any incident of a single bit error can result a user loss of crucial financial assets.


"Ethereum Name Service "is a protocol that provides solution that resolve short, human-readable names ( Like : prok.eth or theprok.eth ) to identifiers like 32 bits sender/receiver address' ( Exp. : 12f7c4c8977a5b9addb52b83e23c9d0f3b89be15) which in actually remains in form of  hashes.

The benefit from it is that users and developers will have to refer to human-readable and easy to remember names, and permits those names to be updated as necessary when the underlying resource (contract, content-addressed data, etc) changes.

A domain need not specify a single resource but the same domain to reference different resources. By using the Ethereum name Service, anyone in the world can access resources on and off the blockchain in this decentralized manner. Thus it is not about registering domain names in the traditional sense by any means.

ENS vs DNS:


ENS has similar goals to DNS, the Internet’s Domain Name Service, i.e like DNS, ENS operates on a system of dot-separated hierarchical names called domains, with the owner of a domain having full control over the distribution of sub domains.

The ENS can be used by Ethereum dApps. When "people" visit a dApp website it is possible it implemented ENS to resolve an Ethereum address through the blockchain. This can be done on client side (Mist or Metamask) or server-side.

It will not remove the need for DNS to visit the website itself, since that is web2.0. You can't, for example, enter "microsoft.eth" as URL in your browser.

The goal of the ENS project is to decentralize the DNS system we use today. Unlike DNS, however, ENS doesn’t deal with registering domains. Instead, users can register a name like “example.eth”. Then, people can send money to this address when payment is required.
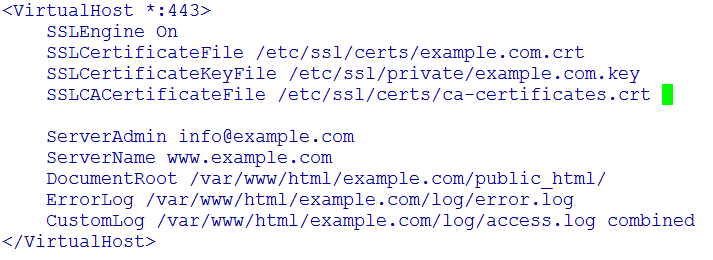
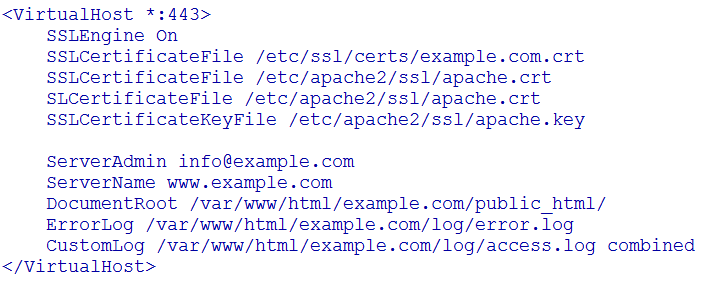
Architecture :


ENS has two principal components: 

      1. Registry                                                                   2. Resolver

The ENS registry consists of a single central contract which maintains a list of all domains and sub domains, and stores three critical pieces of information about each:

  • The owner of the domain
  • The resolver for the domain - 
  • The time-to-live for all records under the domain

The owner of a domain may be either an external account (a user) or a smart contract. A registrar is simply a smart contract that owns a domain, and issues sub domains of that domain to users that follow some set of rules defined in the contract.The owner of a ENS domain has following rights. He/She can
  • Set the resolver and TTL(Time to Live) for the domain
  • Transfer ownership of the domain to another address
  • Change the ownership of sub-domains
The ENS registry is very simple and straightforward, and exists only to map from a name to the resolver responsible for it.

Prequisites to Enter the Auction:


One can purchase desired ".eth" domain from "https://registrar.ens.domains/" webpage. First he/she has to setup a web browser that supported Ethereum Smart Contracts like

Mist ( https://github.com/ethereum/mist/releases )


or Parity( https://parity.io/ )


The users with plain old Google Chrome browser can enable existing browser by installing the Metamask Extension (https://metamask.io/).


Process of Name Auction of ".eth" Domains :


Name auction of ".eth" domains is based on the very generalized concept of “Vickery Auction” or "Second Price Auction".


Steps of auctions are as follows:

Placing The Bid: First, someone opens an auction for a name he wishes to buy, and places a electronically sealed bid and send the necessary funds (minimum of 0.01 ether). This starts a 3 day timer for other people to place bids on the name. During this period, the details of bids remains undisclosed.

Revealing the Bid: When the three days auction finishes, a two day “reveal” period begins. During this period, everyone who bid must reveal the details of their bid. If they don’t do so then they lose their entire bid. If bid is not the highest then the money against the same is refunded deducting a 0.5% fee, which is like application process fees.

Declaring the Winner: At the end of the two day reveal period, the winner is the person who revealed the highest bid, but they only have to pay the amount of the second-highest bidder. Thus the name under consideration is allocated to the winning bidder.

After Bidding :


  • This amount ( bid by the second highest bidder) is locked up in a contract for as long as the winning bidder retains control of the name. 
  • The winner immediately receive the refund of any extra funds and be assigned control of the name in ENS.
  • Once someone wins an auction, the name is theirs for at least a year, after which that can be withdrawn by the registrant upon releasing rights of use of the name and recover the entire amount of their deposit.


The "Beta" or "Soft" Launch :


Not all possible names in ENS are available immediately for bidding. In order to provide ample time for finding and fixing any bugs as the system scales up, and to prevent a massive land rush on day 1, names are being released for auction on a gradual basis over 8 weeks. 

Every possible name becomes available at a random time during that period. One can find out when the name one want becomes available by entering it into one of the apps described below.

https://registrar.ens.domains/https://www.myetherwallet.com/#enshttps://ethtools.com/mainnet/ens/register/


More, right now only names that are seven characters or longer may be registered at the present time. This is done in order to make sure that the highly valuable short names are only made available once the system has gained enough attention to ensure they get bid on fairly, and not all grabbed by early movers intending to resell them.


Anyone who wishes to find to buy a ENS as per its requirement can check availability of the domains, participate in the bidding process and get it exclusively.  Ofcourse Its Very Simple !!! 

One thing to be noted here is that during revealing period, revealing requires access to account/private key, and additional information as well. 

When using the official app, this information is stored in your browser’s local storage, and can be backed up to a JSON file. MEW provides you with the information and expects you to take a screenshot and reenter it when revealing, while ETHTools’ solution stores the information for you on the server side.

Live Auction Process :


1. http://ens.domains/

The official ENS site has more information on ENS, and the documentation provides resources for developers and an FAQ.

2. https://ens.codetract.io/

Codetract provide an excellent dashboard for tracking the process of ENS and seeing metrics on bids and auctions.

3. http://etherscan.io/ens

Etherscan provides tools for looking up domains and auctions, and seeing the latest auction activity.

Advantages of the ENS Project:


The main advantage of the ENS project is that it decentralizes naming services. Today’s DNS system is vulnerable because there’s centralized registry information attackers could exploit. With the ENS project, there’s no central party to attack. There’s no way for attackers to redirect registered names to a different address.

That means a stronger, more secure internet. Registered names work as originally intended – and they’ll always work like that.

Top-level domains, like ‘.eth’ and ‘.test’ are owned by smart contracts called registrars, which specify rules governing the allocation of their sub-domains. Anyone may, by following the rules imposed by these registrar contracts, obtain ownership of a second-level domain for their own use.

Wednesday, August 9, 2017

The Onion Routing using TOR Bridges.

Internet is an amazing place to be, you can sit at one corner and check out what is happening on another corner. When you are browsing on the internet, we are giving away our information.  This information is then used by censors, government, or many other private organizations like marketers which target their customer base and do business according to their browsing patterns. There is a way around this. Anonymous browsing promises to overcome some of these leakages. Anonymous browsing has its own pros and cons. It has is useful for hiding day-to-day activities from the hackers, government and even marketers. It keeps us away from being tracked. It has somehow turned out to be useful for the criminals to keep their illegal activities at bay from crime police. This place is house of Dark Web.

Using TOR Browser


TOR, The Onion Routing is a free browsing software that enables anonymous communication. TOR was developed by US NAVAL Research Team. Their main was to secure the United States intelligence communication online.

Like an onion has several layers, the TOR network is also protected by one layer (relay) connecting to the other, without informing the third layer (relay). That is how it maintains its anonymity. These relays are Entry or Guard relays, Middle relays and Exit relays.


TOR uses nodes or relays to reach the destination that are spread all over the world. Individuals around the world host these TOR relays (Entry, Middle and Exit) to keep the TOR network running. These relays or nodes are basically willing individuals who wish to keep anonymity running act as the connection in between to to host the entry node, middle node or exit nodes. These nodes or relay list(Tor IPs) can be found easily on the net. As these relays are openly available on the web, many organisation or ISP have blocked them as they do not want TOR to run.


Working model of TOR network, The blue cylindrical tube is the traffic flow.

TOR Bridges.


Relays are distributed all over the world and and hence every major security organization has the list of TOR relay IPs. This list is blocked by many service providers around the globe so as to stop the use dark web.

Bridges on the other hand work as the TOR Relays but are not as widely distributed and are only made available upon request. Bridges can be considered as TOR relays that are not listed on to the TOR directory.

You can use tor bridges very easily, one of the ways is to use the bridges available in the tor browser itself. Unfortunately these bridges are publicly available and hence blocked by the censors.

Another way is to mail to bridges@torproject.org, they will provide you with three bridges. "get bridges" is the text to be used when mailing to above address.

Bridges may look like below :

141.201.27.48:443 4352e58420e68f5e40bf7c74faddccd9d1349413

The first entity is IP address : 141.201.27.48
Second entity is port : 443
Last entity is unique identifier of bridge: 4352e58420e68f5e40bf7c74faddccd9d1349413

Your bridge may also look like this.

obfs3 141.201.27.48:420 4352e58420e68f5e40bf7c74faddccd9d1349413

The first entity "obfs3" is the pluggable(PT) transport element. A PT is used to transform the traffic between the client and the bridge so that traffic and it won't actually look like the TOR traffic and bypasses the sniffing elements.


Enabling TOR Bridges


1. Open your TOR browser, and click on Configure


2. Click on Yes, as our ISP is blocking the TOR.


3. Then we may use the default bridge or the one provided by Tor via mail or website.


This will help you by pass the censorship or blocking of TOR in your network. People remain anonymous for multiple reasons but many of these services are exploited by drug dealers, criminals, thieves and even child pornography. If someone encounters with any kind of molestation or even child pornography, they should take a step forward and blow the whistle on such bad activities.


Wednesday, July 5, 2017

NotPetya/Petya : Faulty malware code ?? or Intentional Wiper malware !!

The past week has been one crazy ride with the ransomware/wiper attack Nonpetya outbreak. This malware caused a havoc around the globe especially in Ukraine, Russia, India and US with many more countries in the list. This ransomware/wiper uses wowsmith123456@posteo.net as the contact detail and asks for $300 in bitcoins to a given address.

Working of NotPetya


The ransomware Petya/Not Petya encrypts MFT (Master File Tree) tables for NTFS partitions and that overites the MBR (master Boot Record) with a custom boot loader that shows a message of ransom to the user upon booting. According to several resources Payload Security, Avira this virus exploits the Microsoft's SMB vulnerability ETERNALBLUE, that was also used for Wannacry. Upon more research deep down that the virus also uses one more exploit ETERNALROMANCE.

Once the device is infected it uses the following mechanisms to propagate.

  • EternalBlue : Exploit used by WannaCry
  • EternalRomance : A SMBv1 Exploit leaked by "Shadow Brokers"
  • PsExec : It is a light weight telnet-replacement that lets you perform different                       process on the system.
  •  WMI : Windows Management Instrumentation


Targeted File for encryption


.3ds.7z.accdb.ai.asp.aspx.avhd.back.bak.c.cfg.conf.cpp.cs.ctl.dbf.disk.djvu.doc.docx.dwg.eml.fdb.gz.h.hdd.kdbx.mail.mdb.msg.nrg.ora.ost.ova.ovf.pdf.php.pmf.ppt.pptx.pst.pvi.py.pyc.rar.rtf.sln.sql.tar.vbox.vbs.vcb.vdi.vfd.vmc.vmdk.vmsd.vmx.vsdx.vsv.work.xls.xlsx.xvd.zip.

Ransom Note found on the infected devices


"If you see this text, then your files are no longer accessible, because
they have been encrypted. Perhaps you are busy looking for a way to recover
your files, but don\'t waste your time. Nobody can recover your files without
our decryption service.
We guarantee that you can recover all your files safely and easily.
All you need to do is submit the payment and purchase the decryption key.
Please follow the instructions:
Send $300 worth of Bitcoin to following address:


Send your Bitcoin wallet ID and personal installation key to e-mail :

wowsmith123456@posteo.net"

EMAIL No Longer Valid !!!


This is email address was only single point of contact with the NotPetya authors, and it was to be used for verifying bitcoin payments. This was later in the day blocked by the email service provider Posteo.net. This german based email service provider made sure that they are not linked by whatsoever mean to any malicious activity. Since the email was only single point of contact to receive the decryption keys after being hit, now it would be impossible for the victims to receive their encrypted files.


A Wiper Malware/Not a ransomware


Throughout the whole havoc, it was assumed that the Notpetya is a ransomware and is designed to earn money in the form of bitcoins but later it was discovered that the design of the virus was flawed and the encrypted files could not be decrypted at any cost. It was assumed that the files are encrypted one by one but the Petya reboots the victims computer and encrypts the hard drive's master file table (MFT) and renders the master boot record (MBR).

Many big guns were hit by this wiper attack including several government offices.
  • AP Moller-Maersk
  • WPP
  • Merck & Co.
  • Ukranian Banks, Power Grid
  • Saint Gobain
  • Evraz


How did the Virus or Wiper malware spread ?


This massive outbreak spread when an unidentified attacker compromised the M.E.Doc servers. M.E.Doc is a popular accounting software used by Ukranian companies. When the tainted software reached the clients, the malware Notpetya was then delivered to them.


How to Save yourself from this Wiper malware ? 

First and foremost, one must do the following steps and make sure they are not the brink of being effected.
  • One must apply the MS provided patch MS17-010, this will help do half work.
  • Disable SMBv1 on your devices and move to SMBv2.
  • Ensure you have high end Anti-malware/virus to keep you safe.

One cannot stop NotPetya from spreading but you can keep your system safe by performing the below vaccination.

While trying to understand the working of this malware, the researchers found out that this malware looks up for a file and if that file is found the encryption process would not proceed. Notpetya look for file called perfc in the C:\Windows folder. No we need to create the same in our C:\Windows folder.

Steps to consider

Make sure your files are readable and not hidden. You can do the same by going to your windows folder and under tools tab.


Once all the files are visible, you will find notepad.exe in windows folder. Make a duplicate copy of the same and it will be named as notepad-copy.exe . Now rename the copy file with perfc and it will ask you to confirm for the change in the file name. Continue with "yes" and left to click to check the properties of perfc file and check the read-only box.


Now, click on apply. The file perfc is now created and that is all we need to vaccinate our computer.

Your device is now vaccinated from Petya/NotPetya/Petrwrap/Nyetya/ransomware.


Sunday, June 18, 2017

Unveiling Router Security Issues by CIA

Gone are the days when Cherryblossom was just a Japanese flower. The term is now used to name a hacking program developed by CIA.

Wikileaks dumped new files in their vault 7 series which contains CIA-made hacking tools.

Cherryblossom (CB), a multi-functional framework that can be used to hack various router models. CB compromises wireless networking devices. Cherryblossom monitors the internet activity by performing several software exploits on targets of interest.

Terminologies used in Cherry Blossom :-

Cherry blossom is a project of the program Cherry Bomb in year 2011-2012. Cherry Blossom used below terms to explain how it works.


Flytrap : A wireless access point that is being compromised.

Mission : Task assigned to a Flytrap.

Cherry Tree : Also know as command post, it controls Missions, Flytrap status alerts etc.

Cherry Web : GUI bases command interface for running on cherry tree.


Beacon : A periodic communication between flytrap and CherryTree.


Target : The user whose activities are being monitored.


         Image source : Original Document

Implanting of  Firmware CherryBlossom.

The Flytrap is implanted with Cherry Blossom firmware, either using Claymore tool or by supply chain operation. Beacons on periodic intervals are shared between operators (CT) and the infected routers.

As per the manual on Wikileaks, Cherry Blossom works by monitoring the Access Points and routers by implanting a firmware and delivering software exploits and the internet activities.
The architecture defined in CB does not limits itself to wireless devices, it can spread to wired devices too. These are monitored using "missions".

Mission type may vary depending upon the target source.

  1. Snooping the traffic from Access points and routers.
  2. Alarming the activity of targets.
  3. Forming a virtual private network to internal network.
  4. Monitoring the activities of wired devices.
  5. Altering communication between different parties that believe they are connected more of an interception.
CherryBlossom uses Linux Based tool "Sundew" to find out the make and model of the wireless device. The scanning is done on the basis of MAC address. A series of tasks are performed to find out make and model of the network nodes.

The hacking tools are developed with the help of a non-profit organisation SRI International, the name can only be seen in one document related to Sundew.

CherryBlossom supports various Router/AP models.

According to the documents from CIA, Flytraps can be installed on wireless routers as well as Access Points. You can find the list of all the vendor that are included in the document below. For full vendor specific list please follow the original release document here.

3Com
Accton
Aironet/Cisco
Allied Telesyn
Ambit
AMIT, Inc
Apple
Asustek Co
Belkin
Breezecom
Cameo
D-Link
Gemtek
Global Sun
Linksys
Motorola
Orinoco
Planet Tec
Senao
US Robotics
Z-Com

Unlike the Shadow brokers last release of the hacking tool, Wikileaks just released the documents related to the same and not the actual tool.

Thursday, June 8, 2017

Apache Server Configuration (Debian/Ubuntu)

What is Apache?
Apache is the most popular web server on the internet. It is used to serve more than half of all active websites on the globe. It is an open source web application program for deploying web servers. Apache is developed and maintained by an open community of developers under the Apache Software Foundation. Most commonly used on a UNIX-like (usually Linux), the software is available for a variety of operating system besides UNIX, including Microsoft Windows.
Apache 2 (Version 2.0) has improved support for non-Unix, e.g. Windows and OS/2 too. Apache is free and open source software.
Installing Apache 2 Server:-
Before starting the installation of Apache server, please ensure that the host system must have a FQDN (Fully Qualified Domain Name) hostname.
To check the existing hostname of the system, the following command is used:
Now, To Install the Apache 2 Web Server with its documentation and a collection of their relative utilities, the following command is used:
In Debian operating system, apache keeps its main configuration files within the following directory "/etc/apache2".

There are a number of plain text files and sub-directories in /etc/apache2 directory.
Here we have a need to familiar with the useful files & directories under this.
We are starting with one by one & proceed further to understand it thoroughly.

“apache2.conf” File: This is the main configuration file for the apache web server. Almost all configurations can be done within this file. Although, it is recommended to use separate designated files for simplicity. This file will keep the default configurations and will be the central point of access for the server to read configuration details.

“ports.conf”: This file is used to specify the ports on which the virtual hosts should listen on. Please be sure to check that this file is correct if we are configuring the SSL.

“conf-available” Directory: This directory is used for controlling specific aspects of the Apache configuration.

For example, it is often used to define SSL configuration and default security choices. This directory contains multiple files that are used for further server functionality.
The files under this Directory are explained as:

“apache2-doc.conf” File: This file is used to create an alias of any directory and if we want to provide some access permissions over it so the queries must be written in the apache2-doc.conf file to create any symlinks. An example of symlink is shown below.

charset.conf” File:  In order to set the particular character set over the whole Apache Web Server by default, query must be enabled in charset.conf file.

“localized-error-pages.conf” File: All of the apache error responses are done from this file. It contains the error messages for every dedicated apache failure.

“other-vhosts-access-log.conf” File: In this file, we need to define the access log file location path for every other vhosted domain on this server. The query used for defining that access log file location path is as follow:
security.conf” File: If we need to provide any security parameter to the web server globally then that query or security query will be defined in this file.
“serve-cgi-bin.conf” File: In order to enable any module over the web server so the ifmodule conditions are defined in this file.
Now, we move to other directories on /etc/apache2 directory.
“Conf-enabled” Directory: This directory is responsible for holding the symlinks related to the configuration files in the “conf-available” directory.

“sites-available” Directory: This directory basically contains all the virtual host files that are defined for different-different web sites. This directory contains the available configurations not active configurations.
The files under this Directory are explained as:

“000-default.conf” File: This is the dummy file containing the dummy Virtual host entries. All the other virtual hosts or domains, which are hosted over this server uses the entries similar to this file.
An example of sample Virtual host for a domain is as below:
“default-ssl.conf” File: This is also the dummy file containing the Virtual host configuration for the domains using SSL configurations.
An example of Virtual host for domain using SSL and how it works over https is as below:


Self Signed Certificate :- Here we need to discuss one more thing related to SSL as sometimes, if a user wants to use self signed certificate for SSL connections so the following steps need to be follow to generate the self signed certificate.

Step 1:- First, install or upgrade the package called “openSSL”.

Step 2:- _ Secondly, enable the SSL Module using below commands.
Step 3:- Now, create a Self-Signed SSL Certificate. First, let's create a new directory where we can
                       store the private key and certificate.
           Generate a new certificate and a private key to protect it.
Openssl req –x509 –nodes –days 365 –newkey rsa:2048 –keyout /etc/httpd/ssl/apache.key –out /etc/httpd/ssl/apache.crt
Following things need to understand on the above command:
  • The day’s flag specifies how long the certificate should remain valid. In the example, the certificate    
           will last for one year i.e. 365 Days.
  • The keyout flag specifies the path to our generated key.
  • The out flag specifies the path to our generated certificate.
During the execution of the command, some parameters will ask to fill like Country Name, State, Organization Name, etc. So, you should fill the desired parameters as asked.
Step 4:-          Now, set the file permissions to protect your private key and certificate.
Step 5:-          Now, these self signed certificates can be used to run the domain or server over https                              
                      connection. An example of Virtual host of such SSL enabled domain is as below:
Now, we move to some other directories on /etc/apache2 directory.
“sites-enabled” Directory: This directory establishes which virtual host definitions are actually being used. Usually, this directory consists of symbolic links to files defined in the "sites-available" directory.

“mods-[enabled,available]” Directory: This directory is similar in function to the sites directory, but it defines the modules that can be optionally loaded.
The explanations of the modules which are enabled by default and available in mods-enabled directory are as follows:
“access_compat.load” Module: This module checks the version compatibility of the installed modules and the apache configuration files.
“alias.conf” Module: This module is used to create the fake alias of any directory or file basically means for which we don’t want to show the exact location.
“autoindex.conf” Module: This module loads all of the directories included in apache by default.
“deflate.conf” Module: This module loads the default script types which are used by hosted applications of apache.
“dir.conf” Module: This module loads the types of index pages which are accessed as default by apache server in the directory.
“dnssd.conf” Module: This module allows Apache Server to advertise itself and the available websites to clients compatible with the protocol.
“mime.conf” Module: This module loads different types of files according to their extensions over the internet. It is used to assign content metadata to the content selected for an HTTP response by mapping patterns in the URI or filenames to the metadata values. Some examples are: AddLanguage, AddCharset, AddHandler, etc.
“mpm_event.conf” Module: This module is designed to allow more requests to be served simultaneously by passing off some processing work to the listeners threads, freeing up the worker threads to serve new requests.
“negotiation.conf” Module: This module allows apache to give precedence to some languages in case of a tie during content negotiation. Just list the languages in decreasing order of preference.
“setenvif.conf” Module: This module contains some list of directives that modify normal HTTP response for a request, to handle the browser based problems.
“status.conf” Module: This module helps in updating the server health status reports with the help of an HTML page.


Integration with PHP module:-

In this section, we will see the integration of the Apache Server with PHP module. In order to run the PHP files over the server, we need to follow the below steps.

Step 1:- First, Install the php module packages from repository.
Need to select “Agree” for the installation during the above command execution and PHP will be installed on your Droplet.
Step 2:- Once the above command works, you should just Restart or Reload the Apache Service.
Step 3:- Add a new entry in the Virtual host file of the domain to which the php files need to be run.
               Then the new Virtual host may looks like as below:
Step 3:-  At last, we need to create a Test file in the root folder of the Domain and then check the file by opening it on to the Web Browser.

Virtual Hosting :-
Virtual hosting is a method for hosting multiple websites (domains) on a single server. You can host multiple websites on a single machine with a single IP using virtual hosting. All domains on that server will be sharing a single IP. Virtual hosting is very useful in shared web hosting environments, where hundreds of websites are hosted on a single server. All of the Virtual Host configurations for the different websites are created or stored in the /etc/apache2/sites-available directory on Debian/Ubuntu.

Types of Virtual Hosting :-
Name based Virtual Hosting:-  It is the type of virtual hosting which is defined on the basis of domain name. i.e. single ip is used to host multiple websites on a single web server. Let's create a virtual host file for the website www.example1.com.
  • First, let’s create a directory structure of the website www.example1.com
ubuntu-apache2-example1-directory.png
  • Add the following content to the index.html file.
ubuntu-apache2-example1-index-html.png
  • After that, lets create a virtualhost configuration file for a website www.example1.com  
ubuntu-apache2-example1-apache-conf.png
  • Add the following content.
ubuntu-apache2-example1-apache-conf-details.png
  • Save and close the file when you are finished.

  • Similarly, let’s create a directory structure of the website www.example2.com
ubuntu-apache2-example2-directory.png
  • Add the following content to the index.html file.
ubuntu-apache2-example2-index-html.png
  • After that, let’s create another virtual host file for the website www.example2.com.
ubuntu-apache2-example2-apache-conf.png
  • Add the following content.
ubuntu-apache2-example2-apache-conf-details.png
  • In this way, the two virtualhost files are created for two domains.
  • Now Enable the New Virtual Host Files.
ubuntu-apache2-enable-sites.png
  • Now restart the apache service.
ubuntu-apache2-restart-apache.png

  • Now edit the hosts file of the web server and add the entries of these two domain names as shown below:

ubuntu-apache2-hosts.png

  • After successful restart of apache service, open the domain name example1.com or example2.com on browser.  
ubuntu-apache2-example2-browser.png
IP Based Virtual Hosting :- It is the type of virtual hosting which is defined on the basis of dedicated IP address. i.e. each website is assigned with a dedicated IP address. Let's create a virtual host file for the website www.example3.com.
  • First, create the directory structure of the website.
ubuntu-apache2-example3-apache-conf-details.png
  • Now create the virtual host configuration for the website www.example3.com.
ubuntu-apache2-example3-apache-conf-path.png
  • Add the following content to that file.
ubuntu-apache2-example3-apache-conf.png
  • Save and closed when you are finished.
  • Now create the directory structure for website www.example4.com.
ubuntu-apache2-example4-apache-conf-details.png
  • Now create another virtual host configuration for website www.example4.com.
ubuntu-apache2-example4-apache-conf-path.png
  • Add the following entries in this vhost file.
ubuntu-apache2-example4-apache-conf.png 
  • Save and close when you are finished.
  • Now restart the apache service.
ubuntu-apache2-restart-apache.png
  • Now edit the hosts file of the web server and add the entries of these two domain names as shown below:
ubuntu-apache2-ip-based-host.png
  • On successful restart of the apache service, open the websites i.e. www.example3.com, www.example4.com, in browser.
ubuntu-apache2-example3-browser.png


Here, the Apache Server Configuration ends up.

-/-/-