To go further in this topic, let's see What is CA?
So the answer is:
"A certification
authority (CA) is responsible for attesting to the identity of
users, computers, and
organizations.
The CA authenticates an
entity and vouches for that identity by issuing a digitally signed certificate.
The CA can also manage, revoke, and renew certificates.
A
certification authority can refer to following:
First, An
organization that vouches for the identity of an end user.
Second, A server that is used
by the organization to issue and manage certificates.”
Now, to achieve this, we have configured 3 Servers.
The Details of three machines are as follows:
Server-1: It is a Domain Controller or AD Machine.
a) Computer
Name: ProjectK-AD.
b) OS: Microsoft Windows Server 2012 R2
Standard Edition
c) Domain:
prok.nkn.res.in
d) FQDN:
ProjectK-AD.prok.nkn.res.in
e) IP: 10.40.128.179
Server-2: It is a Standalone Root CA Server.
a) Computer
Name: RootCA.
b) OS: Microsoft Windows Server 2012 R2
Standard Edition
c) Domain:
prok.nkn.res.in
d) FQDN:
RootCA.prok.nkn.res.in
e) IP: 10.40.128.154
Server-3: It is a Enterprise Subordinate CA.
a) Computer Name: SubCA.
b) OS: Microsoft Windows Server 2012 R2
Standard Edition
c) Domain:
prok.nkn.res.in
d) FQDN:
SubCA.prok.nkn.res.in
e) IP: 10.40.128.184
Now, we use this Strategy to achieve the above mentioned goal.
Stag-1: Configure Server-1 with Microsoft ADDS Services & make
it a Simple Domain Controller with having one or two Domain Admins user
accounts.
Stag-2: Configure Server-2 as Standalone Root CA with only
configuring Certification Authority role on it.
Stag-3: Configure Server-3 as Enterprise Subordinate CA which is
having following roles on it.
i)
Certification Authority.
ii)
Certification Authority Web Enrollment.
iii) Online
Responder.
Now, from here, we start to configure this:
For this tutorial, we assume that we already completed the Stag-1 means
we already have Server-1 which is having Domain Controller or AD ready with
user "Administrator" who are having Domain Admin & Enterprise
Admin Privileges.
Now, Quickly move to Stag-2 which is "Configure Server-2 as
Standalone Root CA".
We have the Windows 2012 R2 Standard Edition Server which is used
for setting up the Server-2 as the Standalone Root CA Server.
The Computer Name is: RootCA.
The Computer is the part of AD i.e. of prok.nkn.res.in domain.
1. On Main Desktop, Open the Server Manager.

2. Go to Manage & Add
Roles & Features. (Once click, a wizard starts)

3. In Installation
Type, Select Role Base or Feature Based Installation & click Next.

4. On Server Selection by default the machine i.e. ROOTCA is
selected so not do anything, just click next.

5. On Select Server Roles, Select Active Directory Certificate
Services, then click on Add Features then click Next.


6. On Features section, do not change anything, just click Next.

7. Then on AD CS Section, just click Next & move forward.

8. Then on Role Services, Select Only Certification Authority
& Click Next.

9. Then on Confirmation Section, Just Click on Install & the
Installation will going on.


10. Once the installation completes, click on “ Configure Active
Directory Certificate Services on Destination Server. Then Another window opens for AD CS
Configuration to configure Active Directory Certificate Services & close
this current window.

11. In AD CS Configuration first Page, Just click Next to Move on
to the next Step.
(The Credentials
mentioned are of AD User account credentials.)

12. Now, on Role Services, the Certification Authority is already
selected so just click Next.

13. Now, in Setup Type the Enterprise CA & Subordinate CA both are Enabled because
this Root CA computer is the part of the AD. Otherwise if this machine is not the part of the AD then the
Enterprise CA option will by default disabled or Gray Out.
As we want to setup this as Standalone CA So, Choose Standalone CA
& click Next.

14. Now, in CA Type Section, Select Root CA because we want to
Setup this machine as ROOT CA & click Next.

15. Now in Private Key Section, Choose “ Create a New Private Key”
& Click Next.

16. Now, In Cryptography Section,
a) Select the
Cryptographic Provider as: RSA# Microsoft Software Key Storage Provider.
b) Select Key Length
as: 2048
c) Select hash
algorithm for signing certificates
issued by this CA as: SHA256
& Click Next.

17. In CA Name Section: Give the Common Name for this CA as: “ ProjectK” & Click Next.

18. Specify the Validity Period as 10 Years & Click Next.

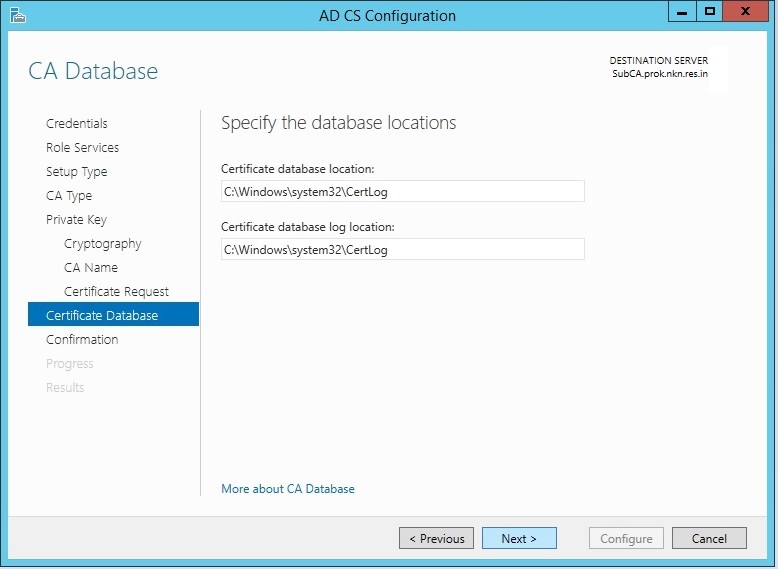
19. On Certificate Database Section, do not change the location,
make it as default & click Next.

20. Now on Confirmation Page, Summary of the Selected option given
so Just Click “Configure”.

21. Once the configuration completes, Please close the Window.

22. Now, Start the Server Manager, Go to Tools & then
Certificate Authority.

23. Certsrv - [Certification Authority (Local)] Snap-In Starts.
See the Root CA named:
ProjectK is showing Right Green Mark on it.

24. Now, In the certsrv – [Certification
Authority (Local)] console, right-click
ProjectK, and then click Properties.
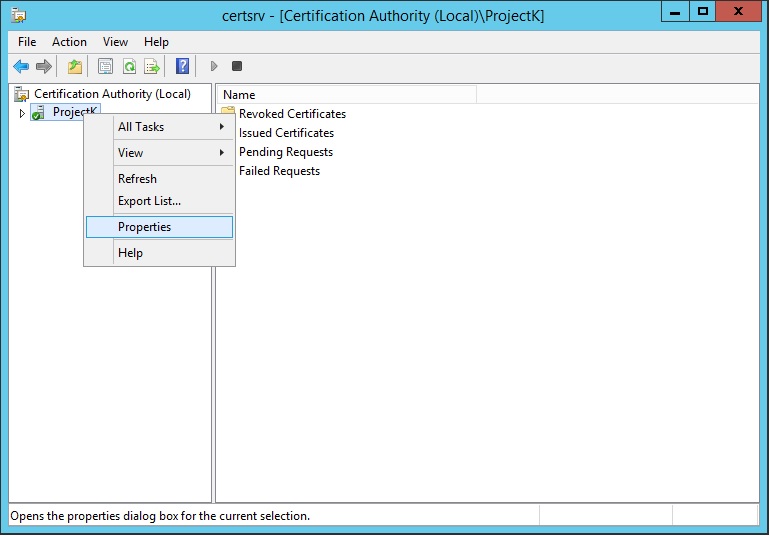
25. In the ProjectK dialog box, click the Extensions tab then on select
extension drop-down list, click CRL
Distribution Point (CDP) and then
Select ldap:// line & click remove.
Select http:// line & click remove.
Select file:/// line & click remove.
Only C:\\Winows\ line remaining in CDP
Extensions Section.
Now, Click Add button.

26. In the Location text box, type http://pki.nkn.res.in/certdata/, in the Variable drop-down list box, click <CaName>, and then click Insert.
Then again, in the Variable drop-down list box,
click <CRLNameSuffix>,
and then click Insert.
Then again, in the Variable drop-down list box,
click <DeltaCRLAllowed>,
and then click Insert,
Then, at the end of URL, type .crl, and then click OK.

27. Next, tick the following options, and then click Apply:
– Include in CRLs.
Clients use this to find Delta CRL locations.
– Include in the CDP
extensions of issued certificates.

28. In the Certification Authority pop-up box,
click No to restart the service.

29. In the Select extension drop-down list box,
click Authority Information Access
(AIA), and then
Select ldap:// line & click remove.
Select http:// line & click remove.
Select file:/// line & click remove.
Only C:\\Winows\ line remaining in AIA
Extensions Section.
Now, Click Add button.

30. In the Location text box, type http://pki.nkn.res.in/certdata/, in Variable drop-down box click <ServerDNSName>, and then
click Insert.
Then, in the Location text box, type an underscore (_),
Then again, in the Variable drop-down list box,
click <CaName> &
click Insert.
and then click Insert. Put your cursor at the end of URL.
Then, in the Variable drop-down list box,
click <CertificateName>,
and then click Insert.
Then, in the Location text box, put your cursor
at the end of URL, type .crt,
and click OK.

31. Select the Include in the AIA extension of
issued certificates box, and then click OK.

32. Click Yes to restart Certification Authority Service.

33. In the Certification Authority console,
expand ProjectK, right-click
Revoked Certificates, point to All Tasks, and then click Publish.

34. In the Publish CRL box, click OK.

35. Right-click ProjectK, and then click Properties.

36. In the ProjectK Properties box, click View Certificate.

37. In the Certificate box, click the Details tab and
then click Copy to File.

38. In the Certificate Export Wizard, on the
Welcome box, click Next.
39. On the Export File Format box, select DER encoded binary X.509 (.CER), and
then click Next.

40. On the File to Export box, click Browse and then in the File name
text box, type\\ProjectK-AD\c$, and
then press Save Button.


41. In the File name text box, type RootCA, click Save, and then click Next.


42. Click Finish, and then click OK.


43. Next, browse to C:\Windows\System32\CertSrv\CertEnroll, copy both files…

44. and then paste to \\Project-AD\c$


Now , we move on to the third Stag i.e. "
Server-3 as Enterprise Subordinate CA".
We
have the another Windows 2012 R2 Standard Edition Server which is used for
setting up as Server-3 as the Enterprise Subordinate CA Server.
The
Computer Name is: SubCA.
The
Computer is the part of AD i.e. of prok.nkn.res.in domain.
1.
On Main Desktop, Open the Server Manager.

2. Then go to Manage & Add
Roles & Features. (Once click, a wizard starts).

3. Then on Installation
Type, Select Role Base or Feature Based Installation & click Next.

4. Then on Server Selection by default the machine i.e. SubCA is
selected so not do anything, just click next.

5. On Select Server Roles, Select Active Directory Certificate
Services, then click on Add Features then click Next.


6. Now, on Features section, do not change anything, just click Next.

7. Then on AD CS Section, just click Next & move forward.


10. Once the installation completes, click on “ Configure Active
Directory Certificate Services on Destination Server. Then Another window
opens for AD CS Configuration to configure Active Directory Certificate
Services & close this current window.

11. In AD CS Configuration first Page, Just click Next to Move on
to the next Step.
(The Credentials
mentioned are of AD User account credentials.)

12. Now, on Role Services, Select all three i.e. Certification
Authority, Certification Authority Web Enrollment, Online Responder & click Next.


a) Select the
Cryptographic Provider as: RSA# Microsoft Software Key Storage Provider.
b) Select Key Length
as: 2048
c) Select hash
algorithm for signing certificates
issued by this CA as: SHA256
& Click Next.


17. In CA Name Section: Give the Common Name for this CA as: “ IssuningCA”
& Click Next.

Important Note: When we configure the Subordinate CA, the wizard
is not asking for Sub CA Validity Period. By Default it has set the Validity Period of Two
Years for Enterprise Subordinate CA & One Year for Standalone Subordinate CA.
We will change the Validity Period of Enterprise Subordinate CA by Standalone Root CA manually from 2 year to 3 Year. We will See it in this tutorial later. For time being, we will go as wizard configures it i.e. for Two Year validity.
We will change the Validity Period of Enterprise Subordinate CA by Standalone Root CA manually from 2 year to 3 Year. We will See it in this tutorial later. For time being, we will go as wizard configures it i.e. for Two Year validity.
18. Now, in Certificate Request Section, we have two option to send the Certificate Signing Request of Sub CA to Root CA Server.
a) First is to “Save a Certificate Request to a File on the target
machine” & the Path of Saved File is as follows: C:\SUBCA_SUBCA-CA.req
b) Second, we will search the ROOTCA on our Network & send it
Directly to ROOTCA Server i.e. ProjectK in our case.
For this, Select First option “ Send a certificate request to a
Parent CA” then select “Computer Name” then Click on Select.
Once click on Select, “Select computer” window opened then Click
on Advanced & Click on Find Now.
It lists the Machines of your AD where we find the Machine Named ROOTCA
on which our Parent CA (ProjectK) is setup. Choose the Machine ROOTCA & Click OK & then Click NEXT.


20. Now on Confirmation Page, Summary of the Selected option given
so Just Click “Configure”.

21. Once the configuration completes, Please close the Window.


25. Right-click RootCA, and then click Install Certificate.

26. In the Certificate Import Wizard,
click Local Machine, and
then click Next.

27. On the Certificate Store box, click Place all certificates in the following store,
and then click Browse, then
you need to click Trusted
Root Certification Authorities, and then click OK.

28. Click Next, and then click Finish.


29. When the Certificate Import Wizard window pops up, click OK.

30. Next, from the SubCA Server, access to
ProjectK-AD Domain Server and copy both Certification Revocation List and Security Certificate.

31.Next, on the SubCA Server, browse to your C
drive and open inetpub folder
and then open wwwroot folder, then create a new folder, and name it
CertData.

32. Paste the
two copied files into that folder…

33. Now, go to RootCA Server to do two things:
a) Increase the Default Validity Period from Two
Years to Three Years for Sub CA.
b) Issue the Sub CA Certificate from Root CA Server & Export it &
Install it on Sub CA Server.
34. Now, First
we extend the validity of Sub CA from Default Two Years to three Years.
For this, Start the Certification Authority Snap-in on RootCA
Server.
Once Certification Authority Snap-In Starts, Expand the RootCA
Tree (ProjectK), See in the pending request, we have to see the SubCA Request
Comes with ID 2.
Now run the below command on command prompt (as Administrator) to
change the Default Validity Period from two years to three years.
certutil -setreg ca\ValidityPeriod "Years"
then
certutil -setreg ca\ValidityPeriodUnits "3"
The Snapshots for running the above
command are as follows:


Now, restart the Certification Authority Service on Root CA
Server.
By Right Click on ProjectK, Select All Tasks then
choose Stop Service.
Again Right Click on ProjectK, Select All Tasks then
choose Start Service.
35. Issue the Sub CA
Certificate from Root CA Server &
Export it & Install it on Sub CA Server.
For this, go to the RootCA Server, open the
Certificate Authority Snap-in & Expand the ProjectK CA.
Go to Pending Requests Section then on right
pane, just right-click the request
(with ID 2), point to All Tasks, and then click Issue.
36. Now, on Root CA Server in Certificate Authority Snap-in, click the Issued Certificates container then double-click the certificate, and then click the Details tab and click Copy to File.

36. Now, on Root CA Server in Certificate Authority Snap-in, click the Issued Certificates container then double-click the certificate, and then click the Details tab and click Copy to File.
The Certificate Export Wizard opens with the Welcome
page, click Next.


37. On the Export File Format box, click Cryptographic Message Syntax Standard – PKCS
#7 Certificates (.P7B), click Include all certificates in the
certification path if possible, and then click Next.

38. On the File to Export box, click Browse (SubCA Server), then in the File name
text box, type SubCA, and then press Enter.

39. Then click Next, then click Finish and then OK.

40. Next, On SubCA Server, in the Certification
Authority console,right-click IssuningCA,
point to All Tasks, and then click Install CA Certificate.

41. Navigate to (C:), click the SubCA.p7b file, and then
click Open.


42. Wait for few second, then right click IssuningCA, click All Tasks
and click Start Service.

43. Verify that the CA starts successfully which confirm by Right Green Sign on IssuningCA.

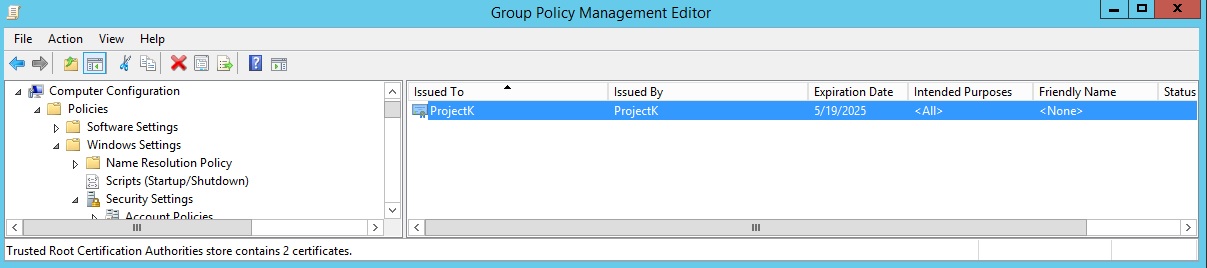
44. Next, you can start publish the root CA certificate to your infrastructure using Group
Policy.
On AD Server (ProjectK-AD) server,
open Group Policy Management, then right-click Default Domain Policy,
and then click Edit.


45. In the Computer Configuration node, expand Policies, expand Windows Settings,
expand Security Settings, expand Public Key Policies, right-click Trusted
Root Certification Authorities, and then click Import.


46. In the Certificate Import Wizard,
click Next…


47. On the File to Import page, click
Browse, in the file name text field, type \\SubCA\c$, and then press Enter, then choose RootCA.cer, and
then click Open.

48. Click Next two times, and then click Finish. When the Certificate Import
Wizard window pops up, click OK.


1. Now, One more thing to do is put the .crl &
.crt files of RootCA Server & SubCA Server at one place.
To do this, we copy the .crl & .crt files of
SubCA Server from c C:\Windows\System32\certsrv\CertEnroll
& paste it in C:\inetpub\wwwroot\certdata folder.
We already copy the .crl & .crt files of
RootCA Server from RootCA Server & paste it in C:\inetpub\wwwroot\certdata
so no need to copy it again.
This C:\inetpub\wwwroot\certdata folder is
publish thru IIS which gives the information of the respective server .crl
& .crt files.
2.
Now, Final thing to
configure is OCSP Response for this CA using Online responder.
First Understand, What is Online Responder so the answer is :
The Microsoft Online Responder service makes it possible to
configure and manage Online Certificate Status Protocol (OCSP) validation and
revocation checking in Windows-based networks. The Online Responder snap-in
allows you to configure and manage revocation configurations and Online
Responder Arrays to support public key infrastructure (PKI) clients in diverse
environments.
Setting up Online Responder services involves several interrelated
steps.
Several of these steps must be performed on the certification
authority (CA) that will be used to issue the Online Certificate Status Protocol
(OCSP) signing certificates necessary for an Online Responder to function.
These steps include configuring the appropriate certificate
template, enabling the certificate template, and configuring and completing
certificate auto enrollment so that the computer hosting the Online Responder
has the certificates needed for the Online Responder to function.
The following Steps are involved to complete the online responder
installation and configuration.
a. Configure a CA to Support OCSP Responders
b. Set Up an Online Responder
c. Creating a Revocation Configuration
d. Verify an Online Responder Installation
3. First we will see Point a i.e. Configure a CA to
Support OCSP Responders.
To
function properly, an Online Responder must have a valid Online Certificate
Status Protocol (OCSP) Response Signing certificate. This OCSP Response Signing
certificate is also needed if you are using a non-Microsoft OCSP responder.
The
certificate template used to issue an OCSP Response Signing certificate must
contain an extension titled "OCSP No Revocation Checking" and the
OCSP Signing application policy. Permissions must also be configured to allow
the computer that will host the Online Responder to enroll for this
certificate.
The
following procedure is for a CA that is installed on a computer running Windows
Server 2012 R2.
Membership
in Domain Admins or Enterprise Admins,
or equivalent, is the minimum required to complete this procedure.
To configure the
certificate template for an OCSP Response Signing certificate, follow these
steps:
a. Open the Certificate
Templates snap-in.
b. Right-click the OCSP
Response Signing template, and then click Properties.
c. Click the Security tab. Under Group
or user name, click Add.
d. Click Object
Types, select the Computers check box, and then click OK.
e. Type the name of or browse
to select the computer hosting the Online Responder or OCSP responder services,
and click OK.
f. In the Group
or user names dialog box, click the
computer name, and in the Permissions dialog box, select the Read and Enroll check boxes. Then click OK.
4. Now, move to Second step i.e. Set Up an Online Responder.
For this important thing is that Internet Information
Services (IIS) must also be installed on this computer before the Online
Responder can be installed.
The Role of Online Responder,
we already installed on the SubCA Machine so quickly move to third step.
5. Now, see " How to creating the revocation configuration"
An Online Responder can make revocation information available from
multiple certification authorities (CAs) and multiple CA certificates. However,
each CA and CA certificate served by an Online Responder requires a separate
revocation configuration.
A revocation configuration includes all of the settings that are
needed to respond to status requests regarding certificates that have been
issued by using a specific CA key. These configuration settings include the
following:
CA certificate. This certificate can be located in Active Directory Domain
Services (AD DS), in the local certificate store, or imported from a
file.
Signing certificate for the Online Responder. This signing certificate can be selected
automatically for you, selected manually (which involves a separate import step
after you add the revocation configuration), or you can use the selected CA
certificate to also serve as the signing certificate.
Revocation provider. The revocation provider will provide the
revocation data used by this configuration. For a Windows
Server 2008 R2 or Windows Server 2008 provider, this information
is entered as one or more URLs where valid base CRLs and delta CRLs can be
obtained.
Before we begin to add a new revocation configuration, make sure
you have the information in the preceding list available.
We must have Manage Online Responder permissions
on all of the Online Responders in the Array to complete this procedure.
To add a revocation configuration to an Online Responder:
a. Open the Online Responder snap-in.
b. In the console tree, click Revocation Configuration.
c. A list of existing revocation configurations appears in the
details pane.
d. In the Actions pane, click Add
Revocation Configuration to start the Add Revocation Configuration
Wizard.
e. Provide the information requested in the wizard.
f. Select CA Certificate Location: Three ways to select CA
Certificate Location.
i) If the certification
authority (CA) certificate has been published to Active Directory Domain
Services (AD DS) and the computer you are configuring has access to this
information in AD DS, click Select a certificate for an
existing enterprise CA.
ii) If AD DS cannot be
accessed and you know the name of the CA certificate and that it exists in the
local root certificate store, click Select a certificate from the local
certificate store.
iii) If AD DS cannot be
accessed and the CA certificate (with a .cer extension) is available on
removable media, click Import certificate from a file.
g. Select Signing
Certificate: Three ways to select Signing Certificate.
i) The default option, Automatically select a signing certificate,
will generally meet most organization's needs. This option allows the
revocation configuration setup process to identify a suitable signing
certificate in the local certificate store. However, if you also enable an
option to automatically enroll for a signing certificate, the Online Responder
service will enroll for and use that signing certificate.
ii) When selecting Manually select a signing
certificate, the Online Responder will not assign any signing certificate
and the user will have to manually select a signing certificates for each of
the Online Responder Array members.
iii) Use the CA certificate for the revocation
configuration can be selected if
the Online Responder is installed on the same computer as the certification
authority (CA).
When all the information has
been entered, click Finish, and then click Yes to
complete the setup process.
We can modify the properties of an existing revocation
configuration, view its CA certificate, or delete the revocation configuration,
by selecting the revocation configuration and clicking Edit Properties in
the Actions pane.
The following properties of a revocation configuration can be
modified:
Local CRL, Revocation provider, Signing.
Thanks & Regards,
Saurabh Srivastava,
-/-/-/-/-