What is Apache?
Apache is the most popular web server on the internet. It is used to serve more than half of all active websites on the globe. It is an open source web application program for deploying web servers. Apache is developed and maintained by an open community of developers under the Apache Software Foundation. Most commonly used on a UNIX-like (usually Linux), the software is available for a variety of operating system besides UNIX, including Microsoft Windows.
Apache 2 (Version 2.0) has improved support for non-Unix, e.g. Windows and OS/2 too. Apache is free and open source software.
Installing Apache 2 Server:-
Before starting the installation of Apache server, please ensure that the host system must have a FQDN (Fully Qualified Domain Name) hostname.
To check the existing hostname of the system, the following command is used:
Now, To Install the Apache 2 Web Server with its documentation and a collection of their relative utilities, the following command is used:
In Debian operating system, apache keeps its main configuration files within the following directory "/etc/apache2".
There are a number of plain text files and sub-directories in /etc/apache2 directory.
Here we have a need to familiar with the useful files & directories under this.
We are starting with one by one & proceed further to understand it thoroughly.
“apache2.conf” File: This is the main configuration file for the apache web server. Almost all configurations can be done within this file. Although, it is recommended to use separate designated files for simplicity. This file will keep the default configurations and will be the central point of access for the server to read configuration details.
“ports.conf”: This file is used to specify the ports on which the virtual hosts should listen on. Please be sure to check that this file is correct if we are configuring the SSL.
“conf-available” Directory: This directory is used for controlling specific aspects of the Apache configuration.
For example, it is often used to define SSL configuration and default security choices. This directory contains multiple files that are used for further server functionality.
The files under this Directory are explained as:
“apache2-doc.conf” File: This file is used to create an alias of any directory and if we want to provide some access permissions over it so the queries must be written in the apache2-doc.conf file to create any symlinks. An example of symlink is shown below.
“charset.conf” File: In order to set the particular character set over the whole Apache Web Server by default, query must be enabled in charset.conf file.
“localized-error-pages.conf” File: All of the apache error responses are done from this file. It contains the error messages for every dedicated apache failure.
“other-vhosts-access-log.conf” File: In this file, we need to define the access log file location path for every other vhosted domain on this server. The query used for defining that access log file location path is as follow:
“security.conf” File: If we need to provide any security parameter to the web server globally then that query or security query will be defined in this file.
“serve-cgi-bin.conf” File: In order to enable any module over the web server so the ifmodule conditions are defined in this file.
Now, we move to other directories on /etc/apache2 directory.
“Conf-enabled” Directory: This directory is responsible for holding the symlinks related to the configuration files in the “conf-available” directory.
“sites-available” Directory: This directory basically contains all the virtual host files that are defined for different-different web sites. This directory contains the available configurations not active configurations.
The files under this Directory are explained as:
“000-default.conf” File: This is the dummy file containing the dummy Virtual host entries. All the other virtual hosts or domains, which are hosted over this server uses the entries similar to this file.
An example of sample Virtual host for a domain is as below:
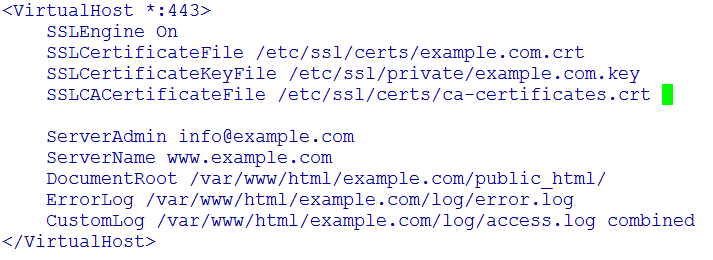
“default-ssl.conf” File: This is also the dummy file containing the Virtual host configuration for the domains using SSL configurations.
An example of Virtual host for domain using SSL and how it works over https is as below:
Self Signed Certificate :- Here we need to discuss one more thing related to SSL as sometimes, if a user wants to use self signed certificate for SSL connections so the following steps need to be follow to generate the self signed certificate.
Step 1:- First, install or upgrade the package called “openSSL”.
Step 2:- _ Secondly, enable the SSL Module using below commands.
Step 3:- Now, create a Self-Signed SSL Certificate. First, let's create a new directory where we can
store the private key and certificate.
Generate a new certificate and a private key to protect it.
Openssl req –x509 –nodes –days 365 –newkey rsa:2048 –keyout /etc/httpd/ssl/apache.key –out /etc/httpd/ssl/apache.crt
Following things need to understand on the above command:
will last for one year i.e. 365 Days.
During the execution of the command, some parameters will ask to fill like Country Name, State, Organization Name, etc. So, you should fill the desired parameters as asked.
Step 4:- Now, set the file permissions to protect your private key and certificate.
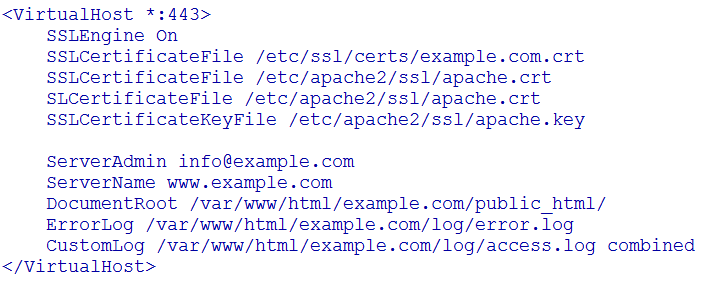
Step 5:- Now, these self signed certificates can be used to run the domain or server over https
connection. An example of Virtual host of such SSL enabled domain is as below:
Now, we move to some other directories on /etc/apache2 directory.
“sites-enabled” Directory: This directory establishes which virtual host definitions are actually being used. Usually, this directory consists of symbolic links to files defined in the "sites-available" directory.
“mods-[enabled,available]” Directory: This directory is similar in function to the sites directory, but it defines the modules that can be optionally loaded.
The explanations of the modules which are enabled by default and available in mods-enabled directory are as follows:
“access_compat.load” Module: This module checks the version compatibility of the installed modules and the apache configuration files.
“alias.conf” Module: This module is used to create the fake alias of any directory or file basically means for which we don’t want to show the exact location.
“autoindex.conf” Module: This module loads all of the directories included in apache by default.
“deflate.conf” Module: This module loads the default script types which are used by hosted applications of apache.
“dir.conf” Module: This module loads the types of index pages which are accessed as default by apache server in the directory.
“dnssd.conf” Module: This module allows Apache Server to advertise itself and the available websites to clients compatible with the protocol.
“mime.conf” Module: This module loads different types of files according to their extensions over the internet. It is used to assign content metadata to the content selected for an HTTP response by mapping patterns in the URI or filenames to the metadata values. Some examples are: AddLanguage, AddCharset, AddHandler, etc.
“mpm_event.conf” Module: This module is designed to allow more requests to be served simultaneously by passing off some processing work to the listeners threads, freeing up the worker threads to serve new requests.
“negotiation.conf” Module: This module allows apache to give precedence to some languages in case of a tie during content negotiation. Just list the languages in decreasing order of preference.
“setenvif.conf” Module: This module contains some list of directives that modify normal HTTP response for a request, to handle the browser based problems.
“status.conf” Module: This module helps in updating the server health status reports with the help of an HTML page.
Integration with PHP module:-
In this section, we will see the integration of the Apache Server with PHP module. In order to run the PHP files over the server, we need to follow the below steps.
Step 1:- First, Install the php module packages from repository.
Need to select “Agree” for the installation during the above command execution and PHP will be installed on your Droplet.
Step 2:- Once the above command works, you should just Restart or Reload the Apache Service.
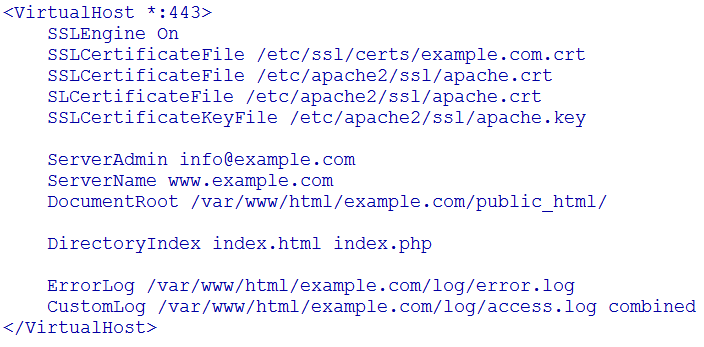
Step 3:- Add a new entry in the Virtual host file of the domain to which the php files need to be run.
Then the new Virtual host may looks like as below:
Step 3:- At last, we need to create a Test file in the root folder of the Domain and then check the file by opening it on to the Web Browser.
Virtual Hosting :-
Virtual hosting is a method for hosting multiple websites (domains) on a single server. You can host multiple websites on a single machine with a single IP using virtual hosting. All domains on that server will be sharing a single IP. Virtual hosting is very useful in shared web hosting environments, where hundreds of websites are hosted on a single server. All of the Virtual Host configurations for the different websites are created or stored in the /etc/apache2/sites-available directory on Debian/Ubuntu.
Types of Virtual Hosting :-
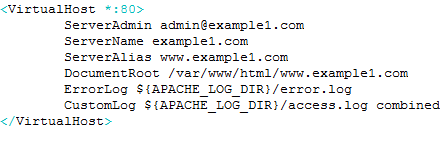
Name based Virtual Hosting:- It is the type of virtual hosting which is defined on the basis of domain name. i.e. single ip is used to host multiple websites on a single web server. Let's create a virtual host file for the website www.example1.com.
In this way, the two virtualhost files are created for two domains.
Now Enable the New Virtual Host Files.
IP Based Virtual Hosting :- It is the type of virtual hosting which is defined on the basis of dedicated IP address. i.e. each website is assigned with a dedicated IP address. Let's create a virtual host file for the website www.example3.com.
On successful restart of the apache service, open the websites i.e. www.example3.com, www.example4.com, in browser.
Here, the Apache Server Configuration ends up.
-/-/-