What is Apache ?
Apache is the most popular web server
on the internet. It is used to serve more than half of all active websites on
the globe. It is an open source web application program for deploying web
servers. Apache is developed and maintained by an open community of
developers under the Apache Software Foundation. Most commonly used on a
UNIX-like (usually Linux), the software is available for a variety of operating
system besides UNIX, including Microsoft Windows.
Before starting the installation procedure, ensure that the
host system must have a FQDN (Fully Qualified Domain Name) hostname.
To check the existing hostname of the
system, the following command is used:

Now, To Install the Apache Web Server
with its documentation and a collection of their relative utilities, the
following command is used:

By default in
CentOS Operating System, Apache installed in the directory at “/etc/httpd”.
The default
directory structure of the installed apache is follows:

There are a number of plain text files and sub-directories in /etc/httpd directory.
Here we have a need to familiar with the useful files & directories
under this.
We are starting with one by one & proceed further to understand it
thoroughly.
“logs” File:- This is the symbolic link for the Default Log file of the Apache Server
which is at /var/www/httpd/ directory.
“modules” File:-
This is the
symbolic link for the Apache modules installed directory which is at /usr/lib64/httpd/modules/ location. Here, all the
Apache Modules are stored.
“run” File:- This is the symbolic link for the
Directory containing the process id file of the Apache Server which is at /var/run/httpd/ location.
“Conf” Directory: - This directory contains the main configuration files of
the Apache Web Server like httpd.conf file.
Here, one
thing that needs to be known is that some of the directives are enabled by
default in the Apache Web Server configuration after installation in httpd.conf
file.
These
directives are described below:
ServerTokens: - This directive is responsible for sending information like
OS type, configured modules etc. to the requesting clients. By default is is
set to OS which replies back the results like:


ServerRoot: - This directive tells us the location of directory where
server keeps all the configurations and log files. By default, the ServerRoot
is as:


Timeout: - This directive is defined in seconds. This is the amount of
time server waits for the receipts and transmissions during the communication
process.

IfModule: - This directive is used as the set of conditional containers
which contains the details of a module. This container gets active only when
the specified module gets loaded.
The example of this
directive is as below:-

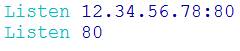
Listen: - This directive used to define the specific port and IP on which
the server accept the requests. The example format of this directive is as
below:-
Include: - This directive is responsible for including the directory
containing configuration files.

Virtual Host: - Apache Server can host multiple websites on a single server. This
task can be achieved by creating multiple Virtual Hosts or Vhosts. The
configuration file for these Vhosts varies depending upon the different Linux
operating systems.
Types of Virtual Host: - There are two types of Vhost configuration.
Name Based Virtual Host: - Name Based Virtual hosting is used for hosting multiple
websites on single IP address.
An example of Name
Based Virtual Hosting is:

IP Based Virtual Host: - IP Based Virtual Hosting is used for hosting multiple websites on
multiple different IP’s.
An example of IP
Based Virtual Hosting is:

Here, one important
thing to know is that the vhost includes some list of directives that are used
for hosting a website. The detailed explanation of these directives is as
follows.
ServerAdmin: - This directive
contains the administrative email id of the domain.

DocumentRoot: - This directive is used to point the directory of the domain
where the related web content files of the domain is stored.

ErrorLog: - This directive contains the path of the log file where the error
logs are stored.
Here, we see an example
of vhost working over http as:

In this section, we
will see the configuration needed for Securing the Apache Web Server.
Here we need to
understand that the Virtual host contains many directives which are used for
running the website on SSL. We will look on some of them now.
SSLEngine: - This directive is used to enable or disable SSL for the
particular Vhost or Domain. It value can be On or Off.

SSLCertificateFile: - This directive contains the exact path of the certificate
file of the domain and binds it with the domain too.

SSLCertificateKey: - This directive contains the exact path of the certificate key of
the included certificate and binds it with the domain.

An example of vhost
using SSL configuration to work over https connection is as follows:

Self-Signed Certificate:- Here we
need to discuss one more thing related to SSL as sometimes, if a user wants to
use self signed certificate for SSL connections so the following steps needs to
be follow to generate the self signed certificate.
Step 1 :- First install
or upgrade the package called “openSSL”.

Step 2:- Now,
create a Self-Signed SSL Certificate. First, let's create a new directory where
we
can store
the private key and certificate.

Generate
a new certificate and a private key to protect it.
Openssl
req –x509 –nodes –days 365 –newkey rsa:2048 –keyout /etc/httpd/ssl/apache.key –out
/etc/httpd/ssl/apache.crt
Following things need to understand
on the above command:
·
The
Days flag specifies how long the certificate should remain valid. In the example,
the
certificate will last for one
year (365 Days).
·
The
keyout flag specifies the path to our generated key.
·
The
out flag specifies the path to our generated certificate.
During the execution of the command,
some parameters will ask to fill like Country Name, State, Organization Name, etc.
So, you should fill the desired parameters as asked.
Step 3:- Now,
set the file permissions to protect your private key and certificate.

Step 4:- Now, these self signed certificates
can be used to run the domain or server over https
Connection. An example of Virtual host of such SSL enabled domain is as
below:

In this section, we
will see the things related to the Apache Log Format. Apache logs provide
detailed information that helps to detect common issues with apache server.
Here we use, mod_log_config
module in order to enable the access log.
There are total of
three directives available in Apache Config file with relation to the logs.
They are as follows:
TransferLog: Creating a log file.
LogFormat: Specifying a custom format.
CustomLog: Creating and formatting a log file.
TransferLog directive
is available in the apache configuration file and it rotates virtual host log
files as per set parameters.

Apache Web Server
Hardening
Hardening of our web
server is very important it means allowing others to see only the intended
information & protecting our web server data and restricting their access.
These are common
things that enhance our Apache Web Servers Security.
Apache displays its
version and the name of the operating system in errors. It is shows as:
Apache/2.2.3 (CentOS)
Server at 1.2.3.4 at Port 80
In order to prevent
Apache web server to display this information, there are some directives which
needs to be set as “off”. There is an option called “server signature” is available
in the Apache Configuration file. By default, it is “on” so here we need to set
it as “off” in httpd.conf file.

Also set
“ServerTokens Prod” Directive which actually tells that the web server to
return only apache and suppress the OS major and minor version.

In this step we are
trying to restrict the access of the files that are placed outside the web server
root directory. For this, configuration needs to be done in httpd.conf file as:

Once the Access of
the files outside to the web root directory get restricted, any visitor will
not be able to access any file located on any other folder on your web server,
they will get 404 return code.
Sometimes, the
document root entry of the domain or server does not have any index file; by
default the apache web server shows the list of all the directories present in
the document root. In order to block or hide the content of the directory,
feature could be turn off for a specific directory through “options directive”
available in the Apache configuration file.

In this section, we will see the integration of the Apache Server with
PHP module. In order to run the PHP files over the server, we need to follow
the below steps.
Step 1:- First, Install the php module
packages from repository.

Need to select “Agree” for the installation during the above command
execution and PHP will be installed on your Droplet.
Step 2:- Once the above command works, you
should just Restart or Reload the Apache Service.

Step 3:- Add a new entry in the Virtual host
file of the domain to which the php files need to be run.
Then the new Virtual host may looks like as below:

Step 3:- At last, we need to create a Test file in the root folder of
the Domain and then check the file by opening it on to the Web Browser.
Virtual Hosting :-
Virtual hosting is a method for hosting multiple websites (domains) on a single server. You can host multiple websites on a single machine with a single IP using virtual hosting. All domains on that server will be sharing a single IP. Virtual hosting is very useful in shared web hosting environments, where hundreds of websites are hosted on a single server. All of the Virtual Host configurations for the different websites are created or stored in the /etc/httpd/con.d directory on Centos/Redhat.
Types of Virtual Hosting :-
Name based Virtual Hosting:- It is the type of virtual hosting which is defined on the basis of domain name. i.e. single ip is used to host multiple websites on a single web server. Let's create a virtual host file for the website www.example1.com.
- First, let’s create a directory structure of the website www.example1.com
- Add the following content to the index.html file.
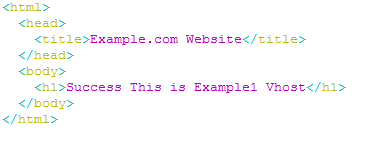
- After that, lets create a virtualhost configuration file for a website www.example1.com
- Add the following content.

- Save and close the file when you are finished.
- Similarly, let’s create a directory structure of the website www.example2.com
- Add the following content to the index.html file.
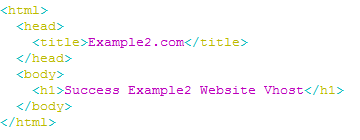
- After that, let’s create another virtual host file for the website www.example2.com.
- Add the following content.

- In this way, the two Virtual host files are created for two domains.
- Now restart the apache service.
- Now edit the hosts file of the web server and add the entries of these two domain names as shown below:

- After successful restart of apache service, open the domain name example1.com or example2.com on browser.

IP Based Virtual Hosting :- It is the type of virtual hosting which is defined on the basis of dedicated IP address. i.e. each website is assigned with a dedicated IP address. Let's create a virtual host file for the website www.example3.com.
- First, create the directory structure of the website.
- Now create the virtual host configuration for the website www.example3.com.
- Add the following content to that file.
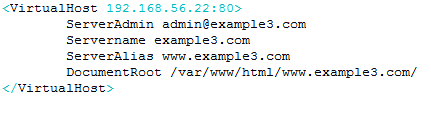
- Save and closed when you are finished.
- Now create the directory structure for website www.example4.com.
- Now create another virtual host configuration for website www.example4.com.
- Add the following entries in this vhost file.

- Save and close when you are finished.
- Now restart the apache service.
- Now edit the hosts file of the web server and add the entries of these two domain names as shown below:

- On successful restart of the apache service, open the websites i.e. www.example3.com, www.example4.com, in browser.

Here, the Apache Server guide ends up.
-/-/-